Discover the easiest way to install garage door weather stripping and boost insulation fast. Perfect for DIY homeowners.
Cold air, dust, and water can enter your garage if it’s not sealed properly. Weather stripping prevents these issues and helps maintain a clean, dry garage space. This guide will show you how to install garage door weather stripping in a simple way, even during garage door installation.
Start by getting basic tools like scissors, a knife, and weather stripping. Clean the edges of the door so the material sticks well. Place the stripping on the sides and bottom of the door, then press or nail it in place. This keeps your garage safe and sealed.
Why Weather Stripping Your Garage Door Matters
Adding weather stripping to your garage door helps keep the space protected and free from dirt. It means adding a soft seal around the door to block out wind, dust, water, and bugs. This guide is for homeowners and DIYers who want to fix this quickly and easily.
Good weather stripping helps lower energy bills by keeping warm air in during winter and cool air in during summer. It also blocks out rain and keeps pests from getting inside. Over time, old weather stripping can wear out, leaving gaps that let in air and water.
If your garage feels drafty or you see light around the door edges, it’s time to replace the seal. Learning how to install garage door weather stripping is easy and can make a big difference. This guide will show you the simple steps to do it right.
What Are the Types of Garage Door Weather Stripping
Weather stripping keeps your garage cleaner, drier, and more energy-efficient. Choosing the right type depends on your door style, local climate, and the amount of effort you’re willing to put into the installation.
1. Bottom Weather Seal
This seal goes on the bottom of your garage door. It comes in U-shape, bulb, or bead-end styles. When the door closes, it squeezes tightly to keep out water, bugs, and dirt. It also helps keep warm or cool air inside.
2. Threshold Seal
This seal sticks to the garage floor right where the door lands. It prevents rainwater and dirt from entering, especially if your driveway has a slope. It works best when used with a bottom seal for added protection from external weather conditions.
3. Stop Molding (Perimeter Seal)
This seal goes around the top and sides of the garage door frame. It blocks wind, dust, and bugs from getting in through the cracks. It’s made of soft rubber or vinyl and is usually nailed into the wooden door frame.
4. Brush Seal
A brush seal has stiff bristles that press against the door when it moves. It’s mostly used in shops or warehouses. It’s great for rough floors and doors that open and close a lot, keeping out dirt, bugs, and cold air.
5. Self-Adhesive, Nail-On, and Retainer Systems
- Self-adhesive strips are easy to apply but may loosen in extreme weather.
- Nail-on versions are stronger but need more tools to install.
- Retainer systems have a track that holds the seal and allows easy replacement.
6. Best Uses by Climate
- Cold climates: Use bulb seals and perimeter seals for better insulation.
- Rainy zones: Add a threshold seal to keep water out.
- Hot or windy areas: Nail-on or retainer systems hold up better long-term.
Tools and Materials Needed for Garage Door Sealing
Ensure you have all the necessary tools and supplies ready before starting your project. This makes the process of how to install a garage door weather stripping smoother, safer, and more effective for long-lasting results.
- Tape Measure: To get an accurate measurement of your garage door’s length.
- Utility Knife or Scissors: To cut the weather stripping to size.
- Hammer or Drill: Used to attach the stripping with nails or screws.
- Nails or Screws: Needed to secure the weather stripping in place.
- Cleaning Cloth and Solution: Clean the surface so the stripping sticks well.
- Safety Gloves: Protect your hands while cutting and installing.
- New Weather Stripping: Choose the right type and make sure it fits your door.
How to Remove Old Weather Stripping
Removing old weather stripping is the first step to sealing your garage door properly. It helps keep your garage clean, dry, and energy-efficient. Stick to these easy steps to make sure it’s done correctly:
1. Safety Tips Before You Start
- Put on gloves to shield your hands from any sharp edges.
- Wear safety glasses when using tools.
- Keep the garage door closed and secure before starting work.
2. How to Remove the Bottom Seal
- Raise the door a little to reach the bottom seal.
- Use pliers or a screwdriver to loosen the seal.
- Gently pull or slide the rubber out from the metal channel.
3. How to Remove Side and Top Seals
- Cut along edges with a utility knife if painted over.
- Use a pry bar or flat tool to remove the seal.
- Take out any nails or screws holding it down.
4. How to Clean and Prep the Surface
- Wipe the area with a cloth and cleaning solution.
- Remove old glue, dirt, or paint chips.
- Let the surface dry before adding new seals.
5. Check for Rust or Rot
- Look at the frame and bottom for rust or soft spots.
- Check for holes or signs of water damage.
- Fix any issues first to make sure the new seals hold.
How to Install Garage Door Weather Stripping
Putting in garage door weather stripping helps keep out cold air, rain, and dirt. It’s an easy way to make your garage more comfortable. Here’s how to install garage door weather stripping.
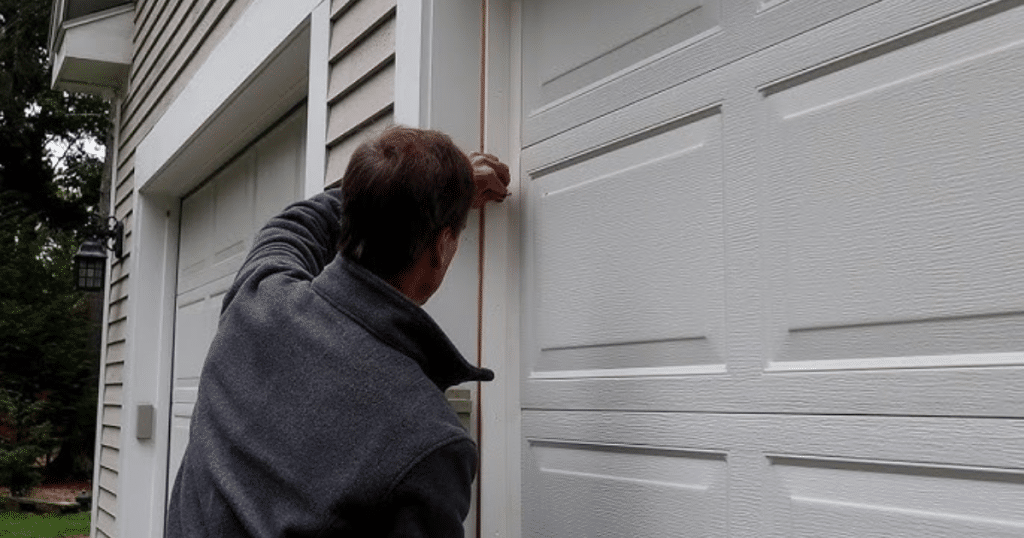
Step 1: Measure and Cut the New Seal
Start by measuring the full width of your garage door using a tape measure. Then, cut your new garage door seal to match that exact length. Use strong scissors or a utility knife for a clean, accurate cut that fits perfectly.
Step 2: Line Up the Bottom Seal
Place the new bottom seal into the metal track beneath the garage door. If your door doesn’t have a track, line it up flush with the bottom edge. Make sure the seal is even on both sides so it fits snugly and looks neat.
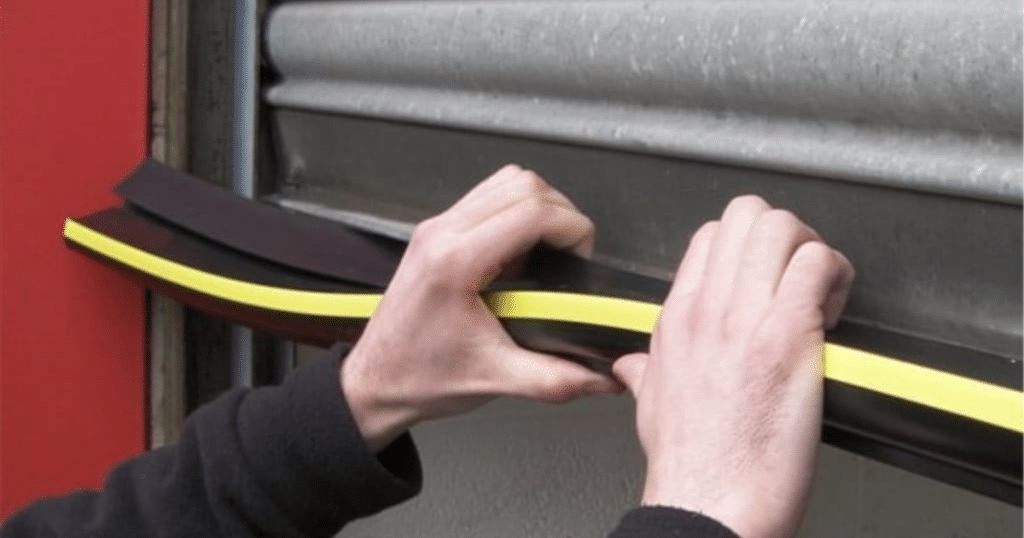
Step 3: Attach the Seal
Secure the seal using nails, screws, or glue depending on the seal type and your garage door. Keep it straight as you press it firmly against the door. This step ensures the seal remains in place and effectively blocks air, water, and pests.
Step 4: Close the Door to Check the Fit
Carefully close the garage door to see how the new seal fits. Look for any light coming through or gaps along the bottom. If you spot any uneven areas, adjust the seal so it sits tightly and keeps your garage well protected.
Step 5: Add Seals to the Sides and Top
If your garage door still has gaps, install side and top seals. Use rubber or vinyl strips and attach them with nails or screws along the door frame. These extra seals help improve insulation and keep out dust, rain, and insects year-round.
Avoid mistakes like poor measurements, wrong tools, skipped steps, or loose parts. Rushing the job can lead to problems. Take your time, follow instructions, and double-check everything for a safe, proper installation.
How Can I Make My Garage Door Seal Last Longer
Installing garage door weather stripping correctly helps it last longer and work more effectively. Here are simple tips to follow for a solid install and how to keep it in top shape.
Install in the Right Weather
Choose a dry day when the temperature is neither too hot nor too cold. The best temperature is between 50°F and 75°F. Cold makes rubber stiff, and heat can weaken glue. Good weather helps the seal stick better and last longer.
Align and Seal Properly
Make sure the weather seal lines up straight with the door. Gaps let in water, wind, and bugs. Use nails, screws, or glue based on the type of seal. Press it down well so it stays in place.
Check Every 6 to 12 Months
Look at your weather stripping twice a year. Check for cracks, hard spots, or loose pieces. Clean it with mild soap and water to remove dirt and dust that can wear it out faster.
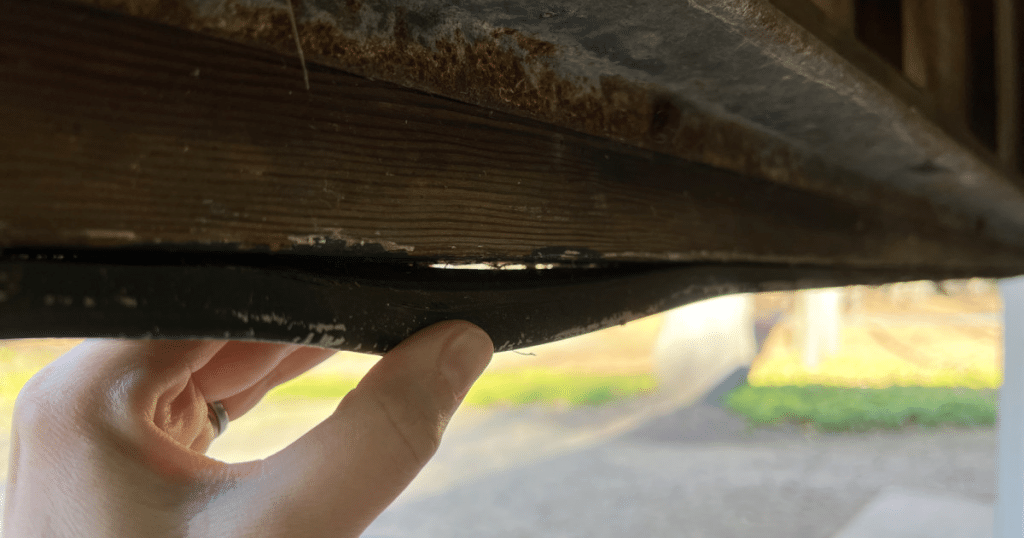
Know When to Replace
If the seal is cracked, hard, or lets in light or air, it needs to be changed. Old or broken weather stripping doesn’t block drafts or keep bugs out. A new seal keeps your garage clean and prevents air and water from entering.
When You Should Call a Garage Door Repair Professional
Knowing when to call a professional for garage door weather stripping can prevent bigger problems and save money. If the door is warped or the track is damaged, it’s best to avoid DIY solutions. This is also true for extra-wide or commercial garage doors that need precise work.
Cleveland County Garage Door offers expert assistance with installing insulated or brush seals. Their team ensures tight sealing, better energy savings, and reliable garage door repair. Everything is done right the first time for long-lasting results and fewer future problems.
Frequently Asked Questions
How do I know if my garage door needs new weather stripping?
You might need new weather stripping if you see light, feel cold air, or notice water, bugs, or dirt coming in. If the strip looks cracked, flat, or is falling off, it’s time to replace your garage door weather stripping.
What is the best weather stripping for a garage door?
Rubber is the best weather stripping for a new garage door. It’s strong, lasts a long time, and stays soft in hot or cold weather. It seals well and keeps out air, water, and bugs better than most other materials.
Can you replace the garage door weather stripping yourself?
Yes, you can replace garage door weather stripping yourself. Just pull off the old strip, clean the edge, and put on the new one. You’ll need simple tools like a screwdriver or hammer. It’s an easy job that keeps your garage sealed.
How long does garage weather stripping last?
Garage door weather stripping lasts about 5 to 10 years. Rain, sun, and cold can wear it out over time. Check it once a year. If it’s cracked or loose, replace it to keep your garage warm and dry.
Is rubber or vinyl better for weather stripping?
Rubber is better than vinyl for weather stripping. It bends better in cold weather and doesn’t crack as fast. Rubber makes a tighter seal, so it keeps out wind, rain, and bugs more than vinyl does. It’s a better long-term choice.
Conclusion
Small fixes like sealing your garage can make a big difference. Learning how to install garage door weather stripping helps keep out cold air, dust, and bugs. With just a few tools, you can make your garage more comfortable and protected.
This easy upgrade keeps your garage clean and saves energy. It works for both new installs and garage door repairs. By blocking moisture, it helps protect your garage door and lowers the chance of future damage or the need for garage door repair.
Cleveland County Garage Doors offers friendly and reliable service for all your garage needs. We’re here to help you keep your garage sealed, safe, and ready for any season.
End Note
If you need a trusted team to handle the job, Cleveland County Garage Doors is here to help. We offer garage door weather stripping services that stop cold air, bugs, and water from getting inside. Visit our website or check out the About page to learn more about us.
Our team does the job right to keep your garage sealed tight. Good weather stripping helps your garage door last longer and keeps your space warmer. We serve Cherryville and nearby areas with fast and friendly service. Take a look at our specials and blog for more tips.
You can see our past work in the gallery, follow us on Facebook, and read what others say on Yelp. We’re also listed on the BBB site. To get started, visit our contact page.