Most homeowners do not think about their garage door springs until something stops working. But by the time a spring breaks, the damage is already done, and you are looking at a broken garage door spring repair that could have been avoided entirely. A simple, consistent checklist is one of the best ways to stay ahead of problems before they turn into emergencies.
This garage door spring maintenance checklist is designed for homeowners in Lawndale, NC, who want a clear, practical guide to what needs to be checked, how often, and what to do when something does not look right. You do not need to be a technician to use this list. You just need to know what to watch for and when to call one.
Why a Maintenance Checklist Matters for Your Garage Door Springs

Garage door springs go through hundreds of cycles every year. Each open and close puts mechanical stress on the coils, cables, and hardware connected to them. Without a regular routine, small issues like minor rust, slight tension loss, or early cable fraying go unnoticed until they cause a bigger failure.
A checklist keeps your inspections consistent and gives you a record of what has been checked and when. It also helps you communicate clearly with a technician when you do call for service.
If you are wondering why this level of attention is necessary, the full breakdown is covered in Why Spring Maintenance Is Essential for Residential Garage Doors.
The Complete Garage Door Spring Maintenance Checklist
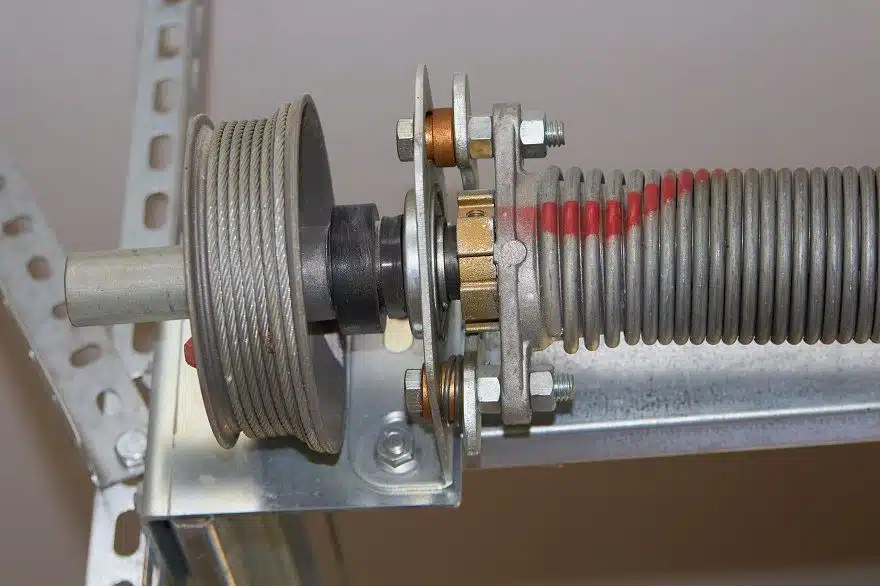
Inspect the Springs Visually for Wear and Damage
This is the starting point of any maintenance routine. Before anything else, take a close look at your springs. You do not need to touch them. A visual inspection from a safe distance is enough to spot early warning signs.
Look for these during your inspection:
- Visible rust or discoloration along the spring coils is common in humid areas like Cleveland County during the summer months.
- Gaps or separation in the coils indicate the spring is stretched beyond its normal range and may be close to breaking.
- Uneven coil spacing, where sections of the spring look tighter or looser than others, points to uneven tension.
Never attempt to touch, adjust, or repair springs on your own. Garage door springs are under extreme tension and can cause serious injury if mishandled. If you notice any of these signs, contact a qualified technician right away.
If you want to know what happens once a technician arrives, read What to Expect From a Pro Garage Door Spring Maintenance.
Check the Door Balance
A properly balanced garage door is one of the clearest indicators that your springs are working correctly. This is a simple test any homeowner can do safely.
Here is how to check:
- Disconnect the automatic garage door opener by pulling the release cord, then manually lift the door to about waist height.
- Let go and observe whether the door stays in place, rises on its own, or drops back down.
- A balanced door stays in place. If it moves in either direction, the spring tension is off and needs professional adjustment.
This test takes less than two minutes and should be part of your regular checklist. An unbalanced door puts unnecessary strain on the opener motor and cables, shortening the life of your entire system.
Listen for Unusual Sounds During Operation
Your ears are one of your best diagnostic tools when it comes to garage door spring maintenance. A well-maintained door operates with minimal noise. Unusual sounds are often the first sign that something needs attention.
Pay attention to these sounds:
- Loud popping or snapping when the door moves, which can indicate spring tension problems or a coil beginning to separate.
- Persistent creaking or squeaking is often caused by insufficient lubrication on the spring coils or surrounding hardware.
- Grinding or scraping, which may point to cables rubbing against hardware or rollers wearing down unevenly.
Do not ignore these sounds. They rarely go away on their own and almost always get worse over time. A quick call to a technician after noticing an unusual noise can prevent a much larger repair.
Inspect the Cables Connected to the Springs
The cables work directly alongside your springs to support the door’s weight. When springs lose tension or begin to fail, the cables are usually the next component to show signs of stress.
Check the cables for these issues:
- Fraying or visible wire separation, which means the cable is weakening and could snap under load.
- Slack or loose tension, where the cable hangs loosely instead of staying taut during operation.
- Rust or corrosion along the cable length, especially near the bottom bracket, where moisture tends to collect.
Routine inspections that include checking the cables alongside your springs align with recommended professional garage door care and maintenance practices used by qualified technicians across the industry.
Cable repairs, like spring repairs, should always be handled by a professional. These components are under significant tension and are not safe for homeowners to adjust without proper training and equipment.
Check the Lubrication on Springs and Moving Parts
Lubrication is one of the simplest and most effective things you can do to extend the life of your garage door springs. Metal components that run dry wear down significantly faster than those that are properly maintained.
When checking lubrication, focus on these areas:
- The spring coils themselves should have a light, even coat of lithium-based or silicone-based lubricant applied along the full length.
- The rollers and hinges also benefit from regular lubrication to reduce friction during operation.
- The bearing plates on either side of the torsion spring, which are often overlooked, play an important role in smooth operation.
Avoid using WD-40 on springs. It is designed as a cleaner and degreaser, not a lubricant, and can actually strip away protective coatings over time. A proper garage door lubricant is inexpensive and widely available at most hardware stores.
Inspect the Bottom Brackets and Anchor Points
The bottom brackets connect the cables to the door and are one of the highest-stress points in the entire system. They are also one of the most commonly overlooked items during a self-inspection.
Here is what to check at the bottom brackets:
- Bent or cracked brackets can shift the cable alignment and increase strain on the springs.
- Loose bolts or fasteners can cause the bracket to shift during operation and throw off the door balance.
- Signs of rust or corrosion, particularly if the door is older or has been exposed to moisture over time.
Bottom brackets are under extreme tension from the spring cables and should never be adjusted or removed by a homeowner. If you notice any of these issues, note them for your technician during the next service visit.
Test the Auto-Reverse Safety Feature
While this step is not directly about the springs, it is a critical part of any garage door safety checklist. The auto-reverse feature is designed to prevent the door from closing on a person, a vehicle, or an object.
To test it:
- Place a flat object like a piece of wood, flat on the ground in the path of the door.
- Close the door using the opener and observe what happens when the door makes contact with the object.
- The door should immediately reverse and open back up. If it does not, the safety feature needs to be adjusted or repaired.
Knowing what a garage door inspection covers helps homeowners stay ahead of both mechanical and safety issues before they become serious problems.
Review Your Maintenance History and Schedule the Next Visit
The last item on your checklist is administrative, but just as important as the physical inspection steps. Keeping a simple log of when your door was last serviced, what was checked, and what was repaired gives you and your technician a clear picture of where your garage door maintenance stands.
Your maintenance log should include:
- Date of last professional service and what the technician inspected or repaired during that visit.
- Any sounds, balance issues, or visual changes you noticed between service visits that should be flagged.
- The estimated cycle count or age of your current springs, so you and your technician can plan for replacement before a failure occurs.
For guidance on how often to schedule a professional visit based on your usage and door age, read When Should You Schedule Garage Door Spring Maintenance? for a full breakdown.
Keep Your Checklist Consistent and Your Door Running Safely

Running through this checklist a few times a year takes less than 30 minutes and gives you a clear picture of your garage door spring health. The goal is not to replace professional service. It is to help you stay informed between visits and catch anything unusual before it becomes a safety issue or an expensive repair.
Homeowners in Lawndale, NC deal with humidity, seasonal temperature changes, and weather conditions that accelerate wear on garage door components. A consistent checklist routine, combined with annual professional service, is the most reliable way to keep your door operating safely year after year.
When it is time to schedule your next professional inspection, Cleveland County Garage Doors is ready to help. Contact us or give us a call to book your maintenance visit and make sure every item on your checklist gets the expert attention it deserves.